OpenCV双目相机测距程序
使用相机的测距功能,辅助精确构图 #生活技巧# #数码产品使用技巧# #相机调焦方法#
本文主要分享一个双目测距的实现程序,用的bumblebee2相机。使用的OpenCV自带的BM算法。 在OpenCV3中,StereoBM算法发生了比较大的变化,StereoBM被定义为纯虚类,因此不能直接实例化,只能用智能指针的形式实例化,也不用StereoBMState类来设置了,而是改成用bm->set...的形式。(转载请注明出处)
详细参数代码请查看链接http://www.cnblogs.com/polly333/p/5130375.html
另外,双目标定,立体匹配和测距的原理网上的已经很全啦,就不多啰嗦啦。使用的matlab自带的标定工具箱进行的标定。下面就上代码吧,废话少说。。。。
#include <opencv2/opencv.hpp>
#include <iostream>
using namespace std;
using namespace cv;
const int imageWidth = 1024;
const int imageHeight = 768;
Size imageSize = Size(imageWidth, imageHeight);
Mat rgbImageL, grayImageL;
Mat rgbImageR, grayImageR;
Mat rectifyImageL, rectifyImageR;
Rect validROIL;
Rect validROIR;
Mat mapLx, mapLy, mapRx, mapRy;
Mat Rl, Rr, Pl, Pr, Q;
Mat xyz;
Point origin;
Rect selection;
bool selectObject = false;
int blockSize = 0, uniquenessRatio = 0, numDisparities = 0;
Ptr<StereoBM> bm = StereoBM::create(16, 9);
Mat cameraMatrixL = (Mat_<double>(3, 3) << 1324.4092, 0, 521.2833,
0, 1328.0859, 392.6668,
0, 0, 1);
Mat distCoeffL = (Mat_<double>(1, 5) << -0.58627, 0.16595, 0, 0.00000, 0.00000);
Mat cameraMatrixR = (Mat_<double>(3, 3) << 1323.9, 0, 523.453,
0, 1326.88, 397.6582,
0, 0, 1);
Mat distCoeffR = (Mat_<double>(1, 5) << -0.63278, 0.47043, 0.00000, 0.00000, 0.00000);
Mat T = (Mat_<double>(3, 1) << -120.9319, 0.3701, 0.1176);
Mat rec = (Mat_<double>(3, 1) << 0.0022, 0.0113, -0.0001);
Mat R;
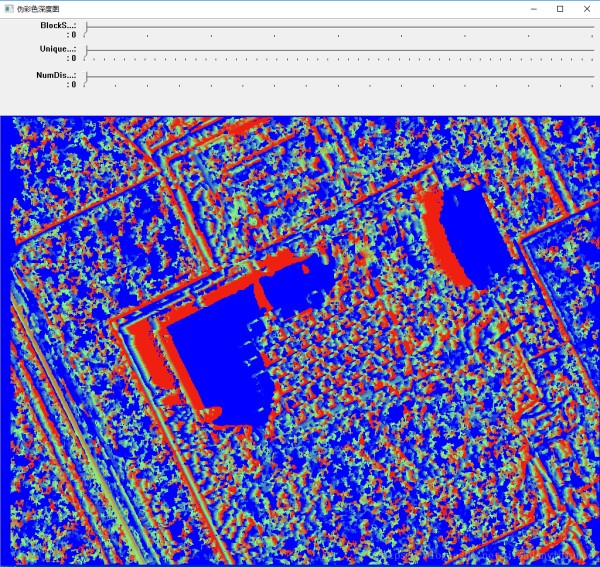
void F_Gray2Color(CvMat* gray_mat, CvMat* color_mat)
{
if (color_mat)
cvZero(color_mat);
int stype = CV_MAT_TYPE(gray_mat->type), dtype = CV_MAT_TYPE(color_mat->type);
int rows = gray_mat->rows, cols = gray_mat->cols;
if (CV_ARE_SIZES_EQ(gray_mat, color_mat) && stype == CV_8UC1 && dtype == CV_8UC3)
{
CvMat* red = cvCreateMat(rows, cols, CV_8U);
CvMat* green = cvCreateMat(rows, cols, CV_8U);
CvMat* blue = cvCreateMat(rows, cols, CV_8U);
CvMat* mask = cvCreateMat(rows, cols, CV_8U);
cvSubRS(gray_mat, cvScalar(255), blue);
cvCopy(gray_mat, red);
cvCopy(gray_mat, green);
cvCmpS(green, 128, mask, CV_CMP_GE);
cvSubRS(green, cvScalar(255), green, mask);
cvConvertScale(green, green, 2.0, 0.0);
cvMerge(blue, green, red, NULL, color_mat);
cvReleaseMat(&red);
cvReleaseMat(&green);
cvReleaseMat(&blue);
cvReleaseMat(&mask);
}
else cout << "大小格式不符合要求" << endl;
}
void stereo_match(int, void*)
{
bm->setBlockSize(2 * blockSize + 5);
bm->setROI1(validROIL);
bm->setROI2(validROIR);
bm->setPreFilterCap(31);
bm->setMinDisparity(0);
bm->setNumDisparities(numDisparities * 16 + 16);
bm->setTextureThreshold(10);
bm->setUniquenessRatio(uniquenessRatio);
bm->setSpeckleWindowSize(100);
bm->setSpeckleRange(32);
bm->setDisp12MaxDiff(-1);
Mat disp, disp8;
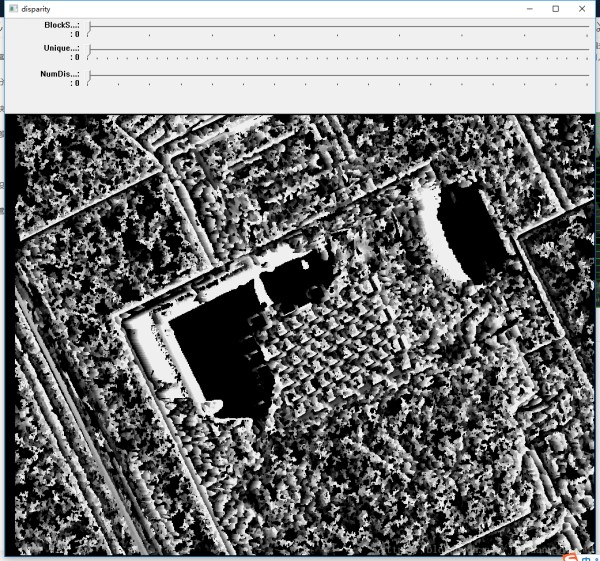
bm->compute(rectifyImageL, rectifyImageR, disp);
disp.convertTo(disp8, CV_8U, 255 / ((numDisparities * 16 + 16)*16.));
reprojectImageTo3D(disp, xyz, Q, true);
xyz = xyz * 16;
imshow("disparity", disp8);
CvMat disp8cv = disp8;
int m = disp8.rows;
int n = disp8.cols;
CvMat* vdispRGB= cvCreateMat(m, n, CV_8UC3);
F_Gray2Color(&disp8cv, vdispRGB);
CvMat* b = vdispRGB;
Mat gray2= cvarrToMat(b);
imshow("伪彩色深度图", gray2);
}
static void onMouse(int event, int x, int y, int, void*)
{
if (selectObject)
{
selection.x = MIN(x, origin.x);
selection.y = MIN(y, origin.y);
selection.width = std::abs(x - origin.x);
selection.height = std::abs(y - origin.y);
}
switch (event)
{
case EVENT_LBUTTONDOWN:
origin = Point(x, y);
selection = Rect(x, y, 0, 0);
selectObject = true;
cout << origin << "in world coordinate is: " << xyz.at<Vec3f>(origin) << endl;
break;
case EVENT_LBUTTONUP:
selectObject = false;
if (selection.width > 0 && selection.height > 0)
break;
}
}
int main()
{
Rodrigues(rec, R);
stereoRectify(cameraMatrixL, distCoeffL, cameraMatrixR, distCoeffR, imageSize, R, T, Rl, Rr, Pl, Pr, Q, CALIB_ZERO_DISPARITY,
0, imageSize, &validROIL, &validROIR);
initUndistortRectifyMap(cameraMatrixL, distCoeffL, Rl, Pr, imageSize, CV_32FC1, mapLx, mapLy);
initUndistortRectifyMap(cameraMatrixR, distCoeffR, Rr, Pr, imageSize, CV_32FC1, mapRx, mapRy);
rgbImageL = imread("left11.png", CV_LOAD_IMAGE_COLOR);
cvtColor(rgbImageL, grayImageL, CV_BGR2GRAY);
rgbImageR = imread("right11.png", CV_LOAD_IMAGE_COLOR);
cvtColor(rgbImageR, grayImageR, CV_BGR2GRAY);
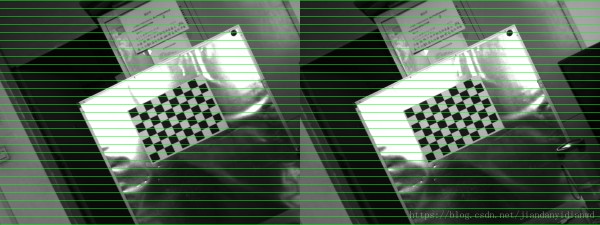
imshow("ImageL Before Rectify", grayImageL);
imshow("ImageR Before Rectify", grayImageR);
remap(grayImageL, rectifyImageL, mapLx, mapLy, INTER_LINEAR);
remap(grayImageR, rectifyImageR, mapRx, mapRy, INTER_LINEAR);
Mat rgbRectifyImageL, rgbRectifyImageR;
cvtColor(rectifyImageL, rgbRectifyImageL, CV_GRAY2BGR);
cvtColor(rectifyImageR, rgbRectifyImageR, CV_GRAY2BGR);
namedWindow("ImageL After Rectify", WINDOW_NORMAL);
imshow("ImageL After Rectify", rgbRectifyImageL);
imshow("ImageR After Rectify", rgbRectifyImageR);
Mat canvas;
double sf;
int w, h;
sf = 600. / MAX(imageSize.width, imageSize.height);
w = cvRound(imageSize.width * sf);
h = cvRound(imageSize.height * sf);
canvas.create(h, w * 2, CV_8UC3);
Mat canvasPart = canvas(Rect(w * 0, 0, w, h));
resize(rgbRectifyImageL, canvasPart, canvasPart.size(), 0, 0, INTER_AREA);
Rect vroiL(cvRound(validROIL.x*sf), cvRound(validROIL.y*sf),
cvRound(validROIL.width*sf), cvRound(validROIL.height*sf));
cout << "Painted ImageL" << endl;
canvasPart = canvas(Rect(w, 0, w, h));
resize(rgbRectifyImageR, canvasPart, canvasPart.size(), 0, 0, INTER_LINEAR);
Rect vroiR(cvRound(validROIR.x * sf), cvRound(validROIR.y*sf),
cvRound(validROIR.width * sf), cvRound(validROIR.height * sf));
cout << "Painted ImageR" << endl;
for (int i = 0; i < canvas.rows; i += 16)
line(canvas, Point(0, i), Point(canvas.cols, i), Scalar(0, 255, 0), 1, 8);
imshow("rectified", canvas);
namedWindow("disparity", CV_WINDOW_AUTOSIZE);
createTrackbar("BlockSize:\n", "disparity", &blockSize, 8, stereo_match);
createTrackbar("UniquenessRatio:\n", "disparity", &uniquenessRatio, 50, stereo_match);
createTrackbar("NumDisparities:\n", "disparity", &numDisparities, 16, stereo_match);
setMouseCallback("disparity", onMouse, 0);
namedWindow("伪彩色深度图", CV_WINDOW_AUTOSIZE);
createTrackbar("BlockSize:\n", "伪彩色深度图", &blockSize, 8, stereo_match);
createTrackbar("UniquenessRatio:\n", "伪彩色深度图", &uniquenessRatio, 50, stereo_match);
createTrackbar("NumDisparities:\n", "伪彩色深度图", &numDisparities, 16, stereo_match);
setMouseCallback("伪彩色深度图", onMouse, 0);
stereo_match(0, 0);
waitKey(0);
return 0;
}
本人菜鸟一只,代码也是参考的一篇博客上的,http://blog.csdn.net/u013316124/article/details/53856797 。。。。代码有简单的修改,增加了伪彩色深度图显示。直接使用的话需要改动图片大小,标定数据和读图地址,另外算法的参数也得微调,不然出来的图会乱七八糟。。。
下面放一些效果图。。。。(深度图的效果一般,bm算法速度快,效果确实差些,参数调的也有点着急)
本文结束。还望多多指教。。。。。(不喜勿喷)
网址:OpenCV双目相机测距程序 https://www.yuejiaxmz.com/news/view/383774
相关内容
基于OpenCV和ROS节点的智能家居服务机器人设计流程【计算机视觉】基于Python—OpenCV的手势识别详解(一)
Python从0到100(七十三):Python OpenCV
碎点篇——opencv边缘检测报错
基于opencv的家居智能安防机器视觉系统
利用手机测量距离长度的方法与技巧(手机测距助你轻松实现精准测量)
基于opencv,使用python提取视频帧以及提取TVL1光流
开源树莓派+OAK相机,打造家庭自动化系统。
基于树莓派opencv—Python的人脸面部特征框选(眼睛和微笑)
什么小程序需要生活服务相关类目?
随便看看
最新动态分享
- 适合搭配的食材
- 食疗养生大全:67种天然食材搭配与食疗方,吃出健康好气色
- 哪些食材可以搭配食用 十对最佳食材搭配好吃又健康
- 壮阳补肾煲汤大全:中药配方与食材搭配全解析
- 广东鱼肚汤的家常做法大全|营养功效+食材搭配+5种经典汤谱(附详细步骤)
- 四季美容养颜豆浆配方大全|天然食材搭配+科学原理,喝出透亮肌
- 零失败家常小炒菜谱大全(附新手必学技巧+食材搭配指南)
- 补肾食谱大全:10种家常食疗方+食材清单,科学搭配提升肾动力
- 5种营养搭配!家常鸡汤快手做法大全(附不同做法+食材禁忌)
- 麻辣香锅食材菜单大全图
热点动态分享
- 144568
- 47418
- 44596
- 40331
- 39853
- 30564
- 25102
- 24902
- 21489
- 18258