基于阿里云物联网平台
阿里云:企业采购平台,可批量购买IT产品 #生活知识# #购物技巧# #线上购物平台#
基于阿里云物联网平台--使用Python模拟设备上报 一、前言二、阿里物联网平台中定义产品三、Python模拟设备上报A、启动配置B、初始化MQTT连接、配置物模型C. 一型一密下注册设备D、各类回调函数E、SDK回调函数连接F、模拟设备属性G、 通讯DEMO 四、上报结果一、前言
最近阿里云物联网平台改版,刚好利用此机会再次了解下MQTT相关内容,本文使用Python语言模拟设备进行数据上报,下一篇文章将介绍使用Python进行云端控制该模拟设备.
二、阿里物联网平台中定义产品
本文默认您已经在物联网平台创建了产品

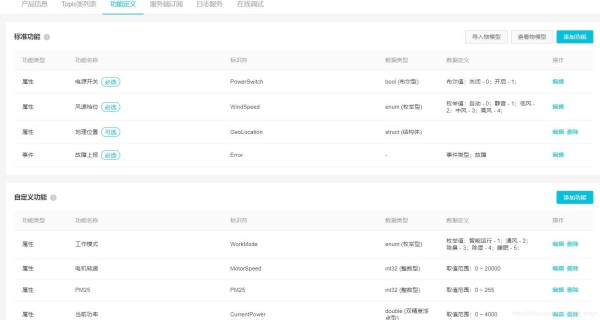
并在产品中定义了如下功能:
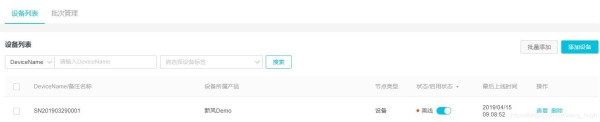
在设备中添加了一台设备:
三、Python模拟设备上报
A、启动配置首先导入官方SK及相关需要使用的包
import configparser , time , hmac , hashlib , logging , os , sys , random from linkkit import linkkit 12
进行基本的配置
LOG_FORMAT = "%(thread)d %(asctime)s %(levelname)s %(filename)s %(lineno)d %(message)s" DATE_FORMAT = "%m/%d/%Y-%H:%M:%S-%p" logging.basicConfig(format=LOG_FORMAT , datefmt=DATE_FORMAT) # 读取相关配置:HostName 、ProductKey 、DeviceName 、DeviceSecret conf = configparser.ConfigParser() config_path = '../WIFI_GPRS_Config.cfg' # 配置文件路径 conf.read(config_path) HostName = conf.get('SETTINGS' , 'hostname') ProductKey = conf.get('SETTINGS' , 'productkey') DeviceName = conf.get('SETTINGS' , 'devicename') ProductSecret = conf.get('SETTINGS' , 'productsecret') # 一型一密 if conf.has_option('SETTINGS' , 'devicesecret'): DeviceSecret = conf.get('SETTINGS' , 'devicesecret') else: DeviceSecret = ''
1234567891011121314151617上述if else判断语句的目的:如果是一机一密,则直接获取配置文件的DeviceSecret ,否则DeviceSecret 置空,进行一型一密的设备注册获取设备密钥(具体见步骤C)
关于一机一密及一型一密,请见官方解释.。
lk = linkkit.LinkKit( host_name=HostName , product_key=ProductKey , device_name=DeviceName , device_secret=DeviceSecret , # 一机一密 / 一型一密 # product_secret = ProductSecret #一型一密 若使用一型一密,增加此行 ) lk.enable_logger(level=logging.DEBUG) lk.thing_setup('../Resources/WIFI_GPRS_Data.json') #物模型路径 12345678910
注意:物模型需要使用完整物模型(在产品-功能定义-查看物模型-导出完整物模型)
C. 一型一密下注册设备若使用一型一密,需要使用此方法(使用一机一密请跳过此步):
def on_device_dynamic_register(rc , value , userdata) : if rc == 0 : conf.set('SETTINGS' , 'DEVICESECRET' , value) #持久化device secret with open(config_path , 'w') as configfile : conf.write(configfile) logging.info("dynamic register device success, rc:%d, value:%s,userdata:%s" % (rc , value , userdata)) else : logging.warning("dynamic register device fail,rc:%d, value:%s" % (rc , value)) #首次启动判断,若无DEVICESECRET,则调用如上注册函数 if not conf.has_option('SETTINGS' , 'DEVICESECRET'): lk.on_device_dynamic_register = on_device_dynamic_register 123456789101112
一型一密 , 首次需要持久化device secret,首次之再次启动模拟设备只能使用持久化的devicesecret,否则会无法连接;
另外一型一密需要提前开启产品的动态注册接口
@连接
def on_connect(session_flag , rc , userdata) : logging.info("on_connect:%d,rc:%d,userdata:" % (session_flag , rc)) 12
@断开连接
def on_disconnect(rc , userdata) : logging.info("on_disconnect:rc:%d,userdata:" % rc) 12
@Topic消息
def on_topic_message(topic , payload , qos , userdata) : logging.info("on_topic_message:" + topic + " payload:" + str(payload) + " qos:" + str(qos)) 12
@订阅
def on_subscribe_topic(mid , granted_qos , userdata) : logging.info("on_subscribe_topic mid:%d, granted_qos:%s" % (mid , str(','.join('%s' % it for it in granted_qos)))) 123
@取消订阅
def on_unsubscribe_topic(mid , userdata) : logging.info("on_unsubscribe_topic mid:%d" % mid) 123
@发布消息
def on_publish_topic(mid , userdata) : logging.info("on_publish_topic mid:%d" % mid) 12
@上报属性
def on_thing_prop_post(request_id , code , data , message , userdata) : logging.info("on_thing_prop_post request id:%s, code:%d message:%s, data:%s,userdata:%s" % (request_id , code , message , data , userdata)) 123
@云端设置属性
def on_thing_prop_changed(message , userdata) : if "PowerSwitch" in message.keys() : prop_data["PowerSwitch"] = message["PowerSwitch"] elif "WindSpeed" in message.keys() : prop_data["WindSpeed"] = message["WindSpeed"] elif "WorkMode" in message.keys() : prop_data["WorkMode"] = message["WorkMode"] else : logging.warning("wrong data:%s" % message) lk.thing_post_property(message) # SDK不会主动上报属性变化,如需要修改后再次上报云端,需要调用thing_post_property()发送 print('prop_data:' , prop_data) print('message:' , message) logging.info("on_thing_prop_changed data:%s " % message) 12345678910111213
== 注意SDK不会主动上报属性变化,如需要修改后再次上报云端,需要调用thing_post_property()发送==
@用户可以进行属性上报,事件上报,服务响应,此调用需要在连接前
def on_thing_enable(userdata) : logging.info("on_thing_enable") 12 E、SDK回调函数连接
SDK进行回调连接
lk.on_connect = on_connect lk.on_disconnect = on_disconnect lk.on_thing_enable = on_thing_enable lk.on_subscribe_topic = on_subscribe_topic lk.on_unsubscribe_topic = on_unsubscribe_topic lk.on_topic_message = on_topic_message lk.on_publish_topic = on_publish_topic lk.on_thing_call_service = on_thing_call_service lk.on_thing_event_post = on_thing_event_post lk.on_thing_prop_changed = on_thing_prop_changed lk.on_thing_prop_post = on_thing_prop_post lk.connect_async() lk.start_worker_loop() time.sleep(2) # 延时 1234567891011121314
在启动连接后增加2s的延时,否则会导致还没有连接成功就上报数据,然后报错
F、模拟设备属性prop_data = { "PowerSwitch" : 1 , "WindSpeed" : 1 , "WorkMode" : 1 , } filter_data = { 'CartridgesLife' : 5000.1 , } 12345678
上述参数在功能定义中为:读写;故与属性上报(只读分开),便于云端设置模拟设备的参数使用
模拟循环上报100次数据(上报只读属性的参数):
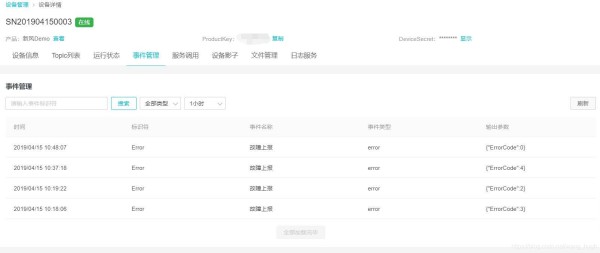
counts = 100 # 模拟上报100次 while counts > 1 : pdata = { "MotorSpeed" : random.randint(8000 , 12000) , "PM25" : random.randint(1 , 255) , "CurrentPower" : round(random.uniform(2000 , 4000) , 2) , "CurretWindSpeed" : round(random.uniform(0 , 450) , 1) , "TVOC" : round(random.uniform(0 , 3) , 2) , "CurrentTemperature" : round(random.uniform(-20 , 55) , 2) , 'Humidity' : random.randint(0 , 100) , 'GeoLocation' : { 'Longitude' : round(random.uniform(-180 , 180) , 6) , 'Latitude' : round(random.uniform(-90 , 90) , 6) , 'Altitude' : random.randint(0 , 9999) , 'CoordinateSystem' : random.randint(1 , 2) , } } rc , request_id = lk.thing_post_property({**prop_data , **pdata}) if rc == 0 : logging.info("thing_post_property success:%r,mid:%r,\npost_data:%s" % (rc , request_id , prop_data)) else : logging.warning("thing_post_property failed:%d" % rc) events = ("Error" , {"ErrorCode" : random.randint(0 , 5)}) rc1 , request_id1 = lk.thing_trigger_event(events) if rc1 == 0 : logging.info("thing_trigger_event success:%r,mid:%r,\npost_data:%s" % (rc1 , request_id1 , events)) else : logging.warning("thing_trigger_event failed:%d" % rc) time.sleep(60) counts -= 1
123456789101112131415161718192021222324252627282930 G、 通讯DEMO为方便演示通讯及接收云端数据,将循环按步骤区分见下:
while True : try : print('''Please input operation code: Code example: '1':disconnect, '2':connect, '3':subcribe topic, '4':unsubcribe topic, '5':publish topic, '6':thing_post ''') msg = input() except KeyboardInterrupt : sys.exit() else : if msg == '1' : lk.disconnect() elif msg == '2' : lk.connect_async() elif msg == '3' : rc , mid = lk.subscribe_topic(lk.to_full_topic("user/get")) if rc == 0 : logging.info("subcribe topic success:%r,mid:%r" % (rc , mid)) else : logging.warning("subcribe topic failed:%d" % rc) elif msg == '4' : rc , mid = lk.unsubscribe_topic(lk.to_full_topic("user/get")) if rc == 0 : logging.info("unsubcribe topic success:%r,mid:%r" % (rc , mid)) else : logging.warning("unsubcribe topic failed:%d" % rc) elif msg == '5' : rc , mid = lk.publish_topic(lk.to_full_topic("user/update") , '"WorkingStatus":3') if rc == 0 : logging.info("publish topic success:%r,mid:%r" % (rc , mid)) else : logging.warning("publish topic failed:%d" % rc) elif msg == '6' : # 此处内容见步骤E pass # 此处内容见步骤E else : logging.warning("Error Code!!!!!!!!!!!!! ") continue
123456789101112131415161718192021222324252627282930313233343536373839404142434445464748第六步循环上报属性见步骤E
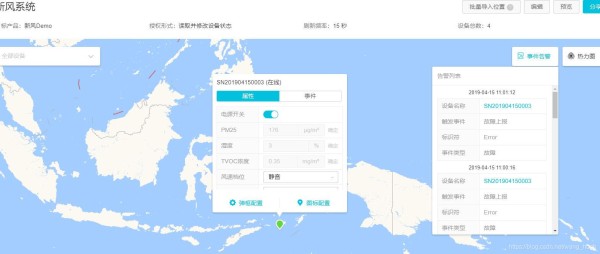
四、上报结果
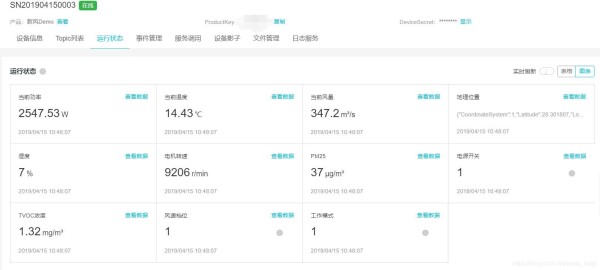
空间数据可视化:
结语:
本文只是简单介绍设备的模拟使用;
下一篇文章介绍使用Python云端控制模拟设备进行参数设置
参考
[1]: https://help.aliyun.com/document_detail/42648.html?spm=a2c4g.11174283.6.641.3a8b1668A6pEm6
[2]: https://help.aliyun.com/document_detail/108675.html?spm=a2c4g.11174283.6.556.2d835523OO5lpo
网址:基于阿里云物联网平台 https://www.yuejiaxmz.com/news/view/122756
相关内容
阿里云物联网平台学习(二)之场景联动阿里云物联网生活平台简介
WIFI设备接入阿里云物联网平台
阿里云生活物联网平台及云智能APP使用保姆级教程
生活物联网平台
【阿里云生活物联网架构师专题 ⑥】ESP8266接入阿里生活飞燕平台国际版,实现亚马逊Alexa Echo音响语音控制;
设备接入阿里物联网云步骤
一分钟了解生活物联网平台概述
智能家居新体验:ESP8266结合阿里云生活物联网远程控制继电器
【阿里云生活物联网架构师专题 ③】esp32 sdk 直连接入天猫精灵IOT开放平台,实现天猫精灵找队友零配网功能和语音控制;
随便看看
最新动态分享
- 家庭消毒不用愁!5大物理消毒法守护健康生活
- カビをアルコール退治|消毒用エタノールでの除菌方法やNG使用法も
- 消毒产品目录
- 基于STM32的智能鞋柜控制系统设计与实现
- 【解決】家具に生えたカビの取り方、予防法、原因を紹介
- 抗菌实验不同操作方法及细节对试验结果的影响
- 多部门推动物联网创新发展 到2028年这些技术要突破
- 生活区节水节电节能管控措施.docx
- 家庭节约用电有哪些具体方法?
- 北京市出台碳普惠管理办法 市民低碳行为将能“变现”
热点动态分享
- 145092
- 52181
- 45095
- 42469
- 40905
- 30878
- 25655
- 25525
- 21902
- 18597