【中工开发者】鸿蒙HarmonyOS小项目开发
游戏教育和培训项目培养新的开发者 #生活乐趣# #游戏乐趣# #游戏开发#
鸿蒙——地区天气查询
今天,我给大家带了一个基础的项目--地区天气查询,下面我详细给介绍一下它的开发和实现过程,希望对初学者有所帮助。
项目介绍
根据高德地图获取城市天气数据,将今日天气状况和最近几天的天气状况可视化,即数据的内容转化为图标的形式,展现出来。可以选择所在的一个城市也可以选择多个城市或者删除之前所选的城市。
环境搭建
我们首先需要完成HarmonyOS开发环境搭建,可参照如下步骤进行。
软件要求
• DevEco Studio版本:DevEco Studio 3.1 Release。
• HarmonyOS SDK版本:API version 9。
硬件要求
• 设备类型:华为手机或运行在DevEco Studio上的华为手机设备模拟器。
• HarmonyOS系统:3.1.0 Developer Release。
环境搭建
安装DevEco Studio,详情请参考下载和安装软件。 设置DevEco Studio开发环境,DevEco Studio开发环境需要依赖于网络环境,需要连接上网络才能确保工具的正常使用,可以根据如下两种情况来配置开发环境:• 如果可以直接访问Internet,只需进行下载HarmonyOS SDK操作。
• 如果网络不能直接访问Internet,需要通过代理服务器才可以访问,请参考配置开发环境。
开发者可以参考以下链接,完成设备调试的相关配置:• 使用真机进行调试
• 使用模拟器进行调试
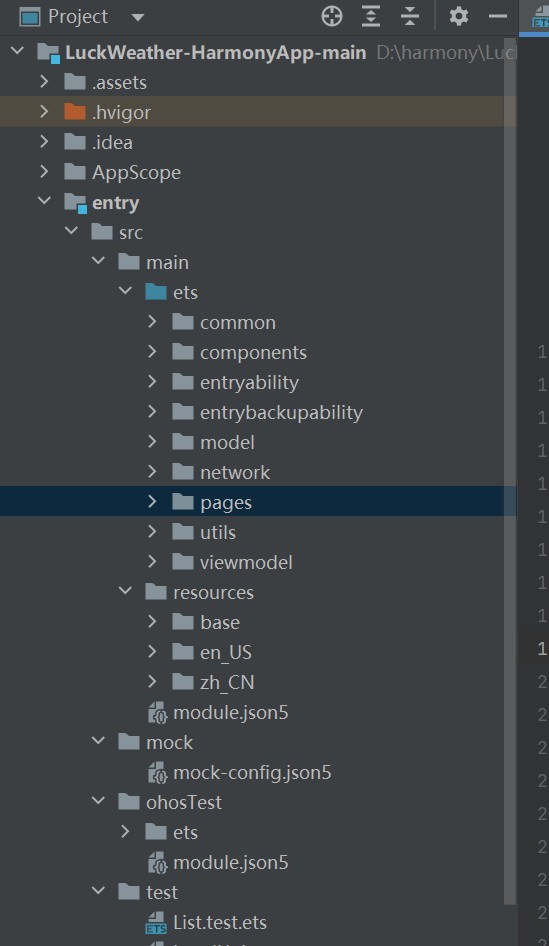
项目结构

项目结构解析
1. 项目目录结构
1. AppScope
这是应用程序的外部容器,包含整个项目的配置和全局设置。2. entry
这个目录通常是应用的入口文件和相关资源,可能包含与应用启动有关的配置或元信息。3. src
这是代码的主目录,包含实际的实现代码。 main 这里是主要的代码结构,通常包含应用的主体部分。 ets: 可能是用于编写鸿蒙操作系统应用的框架的文件(例如,使用ETS语言来开发界面和功能)。 bean: 这个目录可能包含数据模型或实体。 constants: 这里通常存放常量定义,便于在整个项目中使用和维护。 dal: 数据访问层,负责与数据源(如API或数据库)交互。 entryability: 特定的入口能力,可能与应用的启动和权限请求有关。 EntryAbility.ets: 应用的入口能力定义文件。 pages: 包含应用的各个页面。 Index.ets: 首页或主页面的实现文件。 util: 辅助工具或函数库,提供通用功能。 view: 界面层,包含视图组件。 各个以.ets结尾的文件(如AddressAreaComponent.ets、ListHourlyAreaComponent.ets等)是具体的组件实现文件,负责构建应用的UI部分。 viewmodel: MVVM架构的视图模型,处理视图与数据逻辑的绑定。4. resources
存放资源文件,可能包含应用需要的静态文件(如图片、样式等)。 module.json5: 用于配置模块的元数据文件。5. mock
这个目录可能包含用于测试的模拟数据或服务,用于在开发或测试阶段模拟后端服务的响应。6. ohosTest
这个目录可能包含特定于鸿蒙的测试相关代码或配置。7. test
测试目录,通常包含各种单元测试和集成测试代码。8. .gitignore
用于Git版本控制,列出不需要纳入版本控制的文件或目录。这个项目结构清晰地将功能模块和代码分隔开来,便于维护和扩展。各部分职责明确,有助于开发者快速理解和开发应用。
2. 主要功能
实时天气查询:
提供当前天气信息,包括温度、湿度、风速、降水概率等基本天气数据。天气预报:
显示未来几天的天气预报,包括每日最高和最低温度、天气状况(如晴天、阴天、雨天等)。地区选择:
用户可以输入或选择特定的城市或地区进行天气查询,提高用户体验。项目展示
1. 实时天气查询
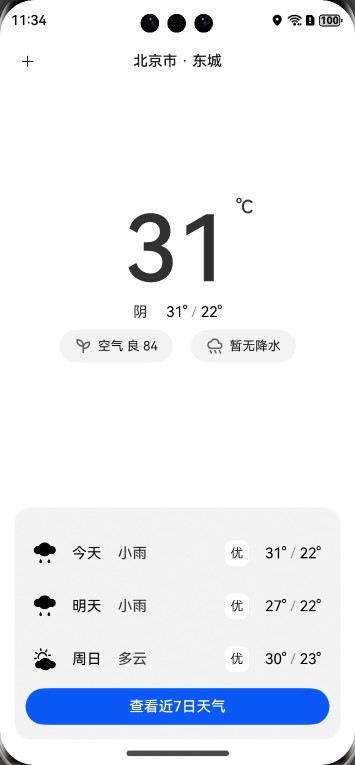
用户可以方便地获取当前所在地区的天气情况,包括:
温度:显示实时温度,帮助用户知晓当前天气。 天气状况:如晴天、阴天、多云等,直观明了。 空气质量指数(AQI):实时监测空气质量,确保用户健康。2. 天气预报
应用提供未来几天的详细天气预报,让用户提前做好计划:
每日最高和最低气温 风速信息及天气状态3. 地区选择
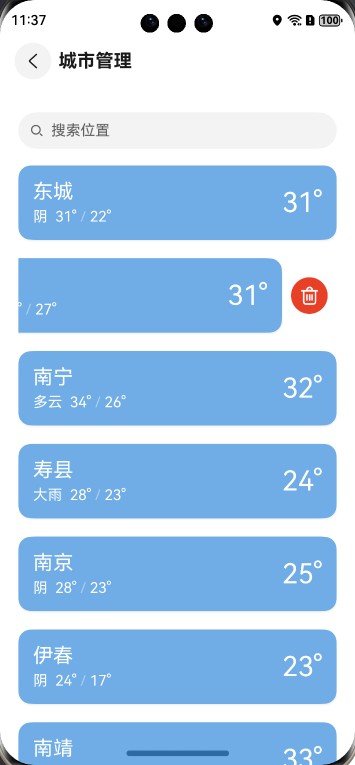
用户可以轻松选择感兴趣的地区进行天气查询。以下是不同城市天气的界面示例:
北京地区天气:
城市切换:

应用实时提供空气质量信息,帮助用户关注环境状况。例如,空气质量良好时,AQI显示为绿色,反之则为红色,以便用户迅速判断是否适合外出。
关键技术
Tabs组件城市切换:
import { cityView } from '../view/cityView' //..... //tarBar 自定义函数 @Builder tabBuild(index: number) { Circle({ width: 10, height: 10 }) .fill(this.cityIndex === index ? Color.White : Color.Gray).opacity(0.4) } //城市切换 Tabs({ barPosition: BarPosition.Start, controller: this.tancontroller }) { ForEach(this.cityWeatherList, (cityWeatherList: WeatherModel) => { TabContent() { cityView({ casts: cityWeatherList.forecasts[0].casts }) }.tabBar(this.tabBuild(this.cityWeatherList.findIndex(obj => obj === cityWeatherList))) }) } .barHeight(20) .barWidth(40) .onChange((index: number) => { this.cityIndex = index })
实验过程
1.通过获取的数据,进行类的构建
在module.json5文件内加入代码
"requestPermissions": [ {"name": "ohos.permission.INTERNET"} ],
创建方法
通过异步获取,将数据以对象的形式返回
//获取数据 getWeather(cityCode:number){ return new Promise<WeatherModel>((resolve,reject)=>{ //创建 let request = http.createHttp() let url= `https://restapi.amap.com/v3/weather/weatherInfo?key=<输入你申请的key值>&city=${cityCode}&extensions=all` let options = { method:http.RequestMethod.GET, header:{'Content-Type':'application/json'}, } as http.HttpRequestOptions let result = request.request(url,options) result.then((res)=>{ if (res.responseCode === 200) { console.log(res.result.toString()) resolve( JSON.parse(res.result.toString())) } }).catch((err)=>{ console.log(err) }) }) } 使用Promise.all方法,同时返回多条数据 //直接获取所有数据 async getWeathers (cityCodeList:Array<number>){ let WeathersDate: Array<WeatherModel> = [] let promises :Array<Promise<WeatherModel>> = [] for (let i = 0; i < cityCodeList.length; i++) { promises.push(this.getWeather(cityCodeList[i])) } await Promise.all(promises).then(result =>{ for (const element of result) { console.log(element.forecasts[0].city); } WeathersDate = result }) return WeathersDate }
根据返回的json数据,创建相应的对象
casts export class casts{ date:string dayweather:string nightweather:string daytemp:number nighttemp:number daywind:string daypower:string daytemp_float:number nighttemp_float:number } forecasts import {casts} from "../viewmodel/casts" export class forecasts{ city:string adcode:number casts:Array<casts> } WeatherModel import {forecasts} from "./forecasts" export class WeatherModel{ status:number count:number infocode:number forecasts:Array<forecasts> = [] }
主页面进行构建,将添加按钮,删除按钮,以及多个城市名称滑动时对应起来,也就是显示的天气状况和城市名称保持一致
页面显示框 //当前tab组件索引 @State cityIndex: number = 0 //城市选择+城市标题 Row() { Button("添加") .fontSize(25) .fontColor(Color.Gray) .opacity(0.7) .backgroundColor("#87CEEB") .margin({ bottom: 15 }) Text(this.cityNameList[this.cityIndex]) .fontSize(40).fontColor(Color.Orange) Button("删除") .fontSize(25) .fontColor(Color.Gray) .opacity(0.7) .backgroundColor("#87CEEB") .margin({ bottom: 15 }) }.height("10%") .width("100%") .justifyContent(FlexAlign.SpaceBetween)
Tabs组件城市切换
import { cityView } from '../view/cityView' //..... //tarBar 自定义函数 @Builder tabBuild(index: number) { Circle({ width: 10, height: 10 }) .fill(this.cityIndex === index ? Color.White : Color.Gray).opacity(0.4) } //城市切换 Tabs({ barPosition: BarPosition.Start, controller: this.tancontroller }) { ForEach(this.cityWeatherList, (cityWeatherList: WeatherModel) => { TabContent() { cityView({ casts: cityWeatherList.forecasts[0].casts }) }.tabBar(this.tabBuild(this.cityWeatherList.findIndex(obj => obj === cityWeatherList))) }) } .barHeight(20) .barWidth(40) .onChange((index: number) => { this.cityIndex = index })
将主页面的今日天气和近期天气状况显示出来,将数据转化为图标
今日天气显示
遍历列表,索引为0的对象为今日天气数据
//当前城市天气
casts: casts[] = [] ForEach(this.casts, (cast: casts) => { if (cast === this.casts[0]) { } }) 设置天气图片 //图片 Row() { if (cast.dayweather === "晴") { Image($r('app.media.sun')).width(260) } if (cast.dayweather === "多云") { Image($r("app.media.cloud")).width(260) } if (cast.dayweather === "阴") { Image($r("app.media.cloud")).width(260) } if (cast.dayweather.includes("雨")) { Image($r("app.media.rain")).width(260) } }.height("30%") 设置天气数据 Column() { //天气 温度 Row() { Text(cast.dayweather).fontSize(30) .fontColor(Color.White).fontWeight(FontWeight.Bold) Text(" " + cast.daytemp + "°~" + cast.nighttemp + "°") .fontSize(30) .fontColor(Color.White) .fontWeight(FontWeight.Bold) } //风力 等级 Row() { Text(cast.daywind + "风 ").fontSize(30) .fontColor(Color.White).fontWeight(FontWeight.Bold) Text(cast.daypower + "级").fontSize(30) .fontColor(Color.White).fontWeight(FontWeight.Bold) } }.margin({ top: 10 })
casts集合内所有天气数据
天气图标自定义函数
@Builder weatherImage(dayweather: string) { if (dayweather === "晴") { Image($r('app.media.sun')).width(30) } if (dayweather === "多云") { Image($r("app.media.cloud")).width(30) } if (dayweather === "阴") { Image($r("app.media.cloud")).width(30) } if (dayweather.includes("雨")) { Image($r("app.media.rain")).width(30) } } 近期天气列表 //近期天气列表 Column() { Text("查看近期天气").fontSize(26).margin({ top: 30 }) //天气列表 Row() { ForEach(this.casts, (cast: casts) => { Column() { Text(cast.date.substring(5)) this.weatherImage(cast.dayweather) Blank() Text(cast.daytemp.toString()) Line() .width(20).height(80).startPoint([10, 0]) .endPoint([10, 70]).stroke(Color.Black) .strokeWidth(3).strokeDashArray([10, 3]) Text(cast.nighttemp.toString()) Blank() this.weatherImage(cast.dayweather) }.height("90%").width("20%") }) } .width("80%") .height("60%") .backgroundColor("#ffbab8b8") .opacity(0.5) .justifyContent(FlexAlign.SpaceAround) }.height("45%").width("100%")
添加城市的页面,当点击添加时,将网络获取的数据城市,可以添加到主页面,将已经添加的和未添加的做标识,实现城市的添加
添加城市页面
添加城市跳转 //主页面按钮跳转 Button("添加") .onClick(() => { router.pushUrl({ url: "pages/AddCity", params: { Codes: this.cityCodeList, Names: this.cityNameList } }) }) //..... //添加城市页面接收数据 onPageShow(){ let params = router.getParams() this.cityCodeList = params["Codes"] this.cityNameList = params["Names"] } 页面数据 @State AllCityCodeList :Array<number> = [110000,120000,130000,140000,210000,220000,310000] @State AllCityNameList :Array<string> = ["北京市","天津市","河北省","山西省","辽宁省","吉林省","上海市"] //当前城市代码列表 接收传入数据的载体 @State cityCodeList :Array<number> = [] @State cityNameList :Array<string> = [] 页面标头 Row(){ Text("添加城市列表").fontSize(35).fontColor(Color.White) Blank() Button("完成").backgroundColor("").fontSize(26) }.height("10%").width("95%") 城市列表 List遍历 //城市列表 Column() { List() { ForEach(this.AllCityNameList, (name: string) => { ListItem() { //写入单个城市名字 } }) } }.width("100%").height("90%") 判断当前遍历的AllCityNameList元素是否包含在cityNameList集合中,并作出对应样式 ,方法调整 if (this.cityNameList.includes(name)) { Column() { Row() { Text(name).fontSize(35).fontColor(Color.White).width("60%") .margin({ top: 20, left: 30 }) Blank() Text("已添加").backgroundColor("").fontSize(18) .margin({ right: 5 }) .opacity(0.8) }.width("100%") Blank() Divider().strokeWidth(5) }.height(90).width("100%").margin({ top: 20 }) .backgroundColor("#4682B4") } else { Column() { Row() { Text(name).fontSize(35).fontColor(Color.White).width("60%") .margin({ top: 20, left: 30 }) Blank() Button("添加").backgroundColor("").fontSize(18) .margin({ right: 5 }) .onClick(() => { //根据name 获取所在索引 let index = this.AllCityNameList.findIndex(obj => obj === name) console.log("index:"+index) //根据索引获得 城市对应的编码 let cityCode: number = this.AllCityCodeList[index] console.log("cityCode= "+cityCode) //将编码加入列表 this.cityCodeList.push(cityCode) this.cityNameList.push(name) console.log(this.cityCodeList.toString()) }) }.width("100%") Blank() Divider().strokeWidth(5) }.height(90).width("100%").margin({ top: 20 }) .backgroundColor("#87CEEB") } 页面返回 Button("完成") .onClick(()=>{ router.back({ url:"pages/Index", params:{ Codes:this.cityCodeList } }) }) //主界面接收数据 onPageShow() { let params = router.getParams() if (params) { this.cityCodeList = params["Codes"] this.cityWeatherList = [] this.cityNameList = [] this.initData() } }
城市的删除,当点击删除按钮时,将弹出对话框,确认删除后,即可将当前的城市
城市删除方法 Button("删除") .onClick(() => { AlertDialog.show({ title: "删除", message: `你确定要删除${this.cityNameList[this.cityIndex]}消息吗?`, confirm: { value: "确定", action: () => { this.cityNameList = this.cityNameList.filter(item => item !== this.cityNameList[this.cityIndex]) this.cityCodeList = this.cityCodeList.filter(item => item !== this.cityCodeList[this.cityIndex]) this.cityWeatherList = this.cityWeatherList.filter(item => item !== this.cityWeatherList[this.cityIndex]) } } }) })
天气视图数据模型生成辅助类,用来根据天气数据生成对应的视图数据模型
class WeatherDataHelper { /** * 返回城市代码 * @param model 天气数据对象 */ getCity(model: WeatherModel) { return model.result.city } /** * 生成AQI区域的数据模型 * @param model 天气数据对象 */ getAqiViewModel(model: WeatherModel) { let viewmodel = new AqiViewModel(); viewmodel.aqi = Number.parseInt(model.result.aqi.aqi) viewmodel.quality = model.result.aqi.quality return viewmodel } /** * 生成当前天气区域的数据模型 * @param model 天气数据对象 */ getNowViewModel(model: WeatherModel) { let viewmodel = new NowViewModel(); viewmodel.weather = model.result.weather viewmodel.temp = model.result.temp + "℃" viewmodel.templow = "最低" + model.result.templow + "℃" viewmodel.temphigh = "最高" + model.result.temphigh + "℃" return viewmodel } /** * 生成未来12小时天气区域的数据模型 * @param model 天气数据对象 */ getHourListDataSource(model: WeatherModel): Array<HourlyViewModel> { let listItems: Array<HourlyViewModel> = []; for (let i = 0; i < CommonConstants.HOURLY_LIST_SIZE; i++) { let itemInfo: HourlyViewModel = new HourlyViewModel(); itemInfo.temp = model.result.hourly[i].temp + "℃"; itemInfo.img = "weather/" + model.result.hourly[i].img + ".png" ; let hour:number = Number.parseInt( model.result.hourly[i].time.split(':')[0] ) ; itemInfo.time = TimeFormat.formatAMPM(hour) listItems.push(itemInfo); } return listItems; } /** * 生成未来七天天气区域的数据模型 * @param model 天气数据对象 */ getDailyListDataSource(model: WeatherModel): Array<DailyViewModel> { let listItems: Array<DailyViewModel> = []; for (let i = 0; i < CommonConstants.DAILY_LIST_SIZE; i++) { let itemInfo: DailyViewModel = new DailyViewModel(); itemInfo.week = model.result.daily[i].week itemInfo.img = "weather/" + model.result.daily[i].day.img + ".png" itemInfo.windpower = model.result.daily[i].day.windpower itemInfo.templow = model.result.daily[i].night.templow + "℃" itemInfo.temphigh = model.result.daily[i].day.temphigh + "℃" listItems.push(itemInfo); } return listItems; } } let weatherDataHelper = new WeatherDataHelper(); export default weatherDataHelper as WeatherDataHelper;
鸿蒙天气查询项目提供了全面的天气服务,凭借其强大功能和优秀的用户体验,旨在为用户的日常生活带来便利。未来,我们计划持续优化应用,增加更多实用功能,以满足不同用户的需求。
网址:【中工开发者】鸿蒙HarmonyOS小项目开发 https://www.yuejiaxmz.com/news/view/1256984
相关内容
鸿蒙HarmonyOS应用开发HarmonyOS NEXT开启Beta测试,鸿蒙生态迎来发展里程碑
鸿蒙HarmonyOS NEXT中级开发实战:打造一款高效天气预报APP
鸿蒙HarmonyOS天气预报APP
Harmony鸿蒙实战开发项目
HarmonyOS实战开发:Divider(基础组件)
鸿蒙应用开发教程第02期:完整开发流程,速戳!
华为鸿蒙电脑即将发布,旧款电脑无缘HarmonyOS 5升级
4天带你上手HarmonyOS ArkUI开发——《HarmonyOS ArkUI入门训练
鸿蒙智联生态产品《接入智慧生活App开发指导》(官方更新版)

