硬件管理平台
多平台游戏需要跨设备适配硬件 #生活乐趣# #游戏乐趣# #游戏硬件#
硬件管理平台-硬件产品库-导出zip
前言
下一步工作主要围绕硬件项目的来进行,通过界面来展示硬件内容并可以进行勾选,勾选后导出zip压缩包来完成。
本文不会像之前的文章一样通篇叙述的是一个功能或者说一个模块,而是由多个功能点来完成是,虽然题目是导出zip,不过本文会掺杂着一些其他的功能说明。
TreeView改进
添加CheckBox框
在MainForm_Load中添加如下代码
//设置checkbox hardwareTV.CheckBoxes = true;
主要作用是在树上展示出checkbox框,可以进行选择。然后选中hardwareTV控件,选择右侧属性中的事件,选择AfterCheck事件,双击后vs会自动添加该事件。
在AfterCheck事件中,我们实现当选择的是硬件类(例如空调这个类型)时,下发的硬件都会被选中,反之会取消。
#region 父子级联动 // 判断该动作是通过鼠标点击获得的 if (e.Action == TreeViewAction.ByMouse) { // 影响选中节点的所有子节点 ChangeChildNode(e.Node, e.Node.Checked); // 如果选择的是具体硬件(子节点),则影响父节点 ChangeParentNode(e.Node); } #endregion
代码中有三个方法需要进行添加,分别是ChangeChildNode和ChangeParentNode。
ChangeChildNode
选择的节点下方所有子节点都选中/取消,如果没有子节点,虽然也会进入该方法,不过不会有影响。
/// <summary> /// ChangeChildNode递归当前节点勾,根据当前几点选状态决定的所有子节点是否勾选 /// </summary> /// <param name="node"></param> /// <param name="state"></param> private void ChangeChildNode(TreeNode node, bool state) { node.Checked = state; foreach (TreeNode tn in node.Nodes)ChangeChildNode(tn, state); }
ChangeParentNode
选择的节点的父节点被选中/取消,方法内部判断了是否有父节点。
/// <summary> /// ChangeParentNode递归父节点跟随其全选或全不选 /// </summary> /// <param name="node"></param> private void ChangeParentNode(TreeNode node) { if (node.Parent != null)//Parent父节点 { //兄弟节点被选中的个数 int brotherNodeCheckedCount = 0; //遍历该节点的兄弟节点 foreach (TreeNode tn in node.Parent.Nodes) {//node.Parent.Nodes 当前点击节点的父节点的子节点集合/所有兄弟节点 if (tn.Checked == true)//判断兄弟节点勾选状态 brotherNodeCheckedCount++;//勾选加一 } //兄弟节点全没选,其父节点也不选 if (brotherNodeCheckedCount == 0) { node.Parent.Checked = false; //点击的节点父节点设置为不勾选状态 ChangeParentNode(node.Parent);//递归父节点-- } //兄弟节点只要有一个被选,其父节点也被选 if (brotherNodeCheckedCount >= 1) { node.Parent.Checked = true; ChangeParentNode(node.Parent); } } }
添加AfterSelect事件
该事件主要的功能是选中后展示硬件信息。
当进行勾选后,也需要展示硬件信息时,需要修改AfterCheck方法。
#region 展示硬件信息 if (e.Node.Tag != null) { HardwareProperties hardware = (HardwareProperties)e.Node.Tag; ShowMessage(hardware); } #endregion
其中ShowMessage为展示参数
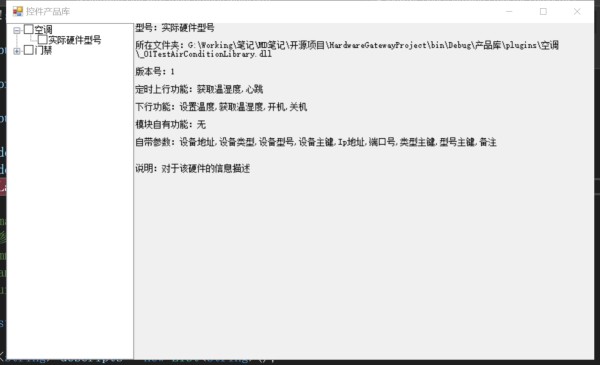
/// <summary> /// 展示硬件信息 /// </summary> /// <param name="propertie"></param> private void ShowMessage(HardwareProperties propertie) { StringBuilder builder = new StringBuilder(); infoLab.Text = ""; builder.AppendLine($"型号:{propertie.Model}"); builder.AppendLine(); builder.AppendLine($"所在文件夹:{propertie.Folder}"); builder.AppendLine(); builder.AppendLine($"版本号:{propertie.Version}"); builder.AppendLine(); builder.AppendLine($"定时上行功能:{GetFunctionByDescription(propertie.TimeingFun)}"); builder.AppendLine(); builder.AppendLine($"下行功能:{GetFunctionByDescription(propertie.OperationFun)}"); builder.AppendLine(); builder.AppendLine($"模块自有功能:{GetFunctionByDescription(propertie.IndependentFun)}"); builder.AppendLine(); builder.AppendLine($"自带参数:{string.Join(",", propertie.Params)}"); builder.AppendLine(); if (!string.IsNullOrEmpty(propertie.RelyOnFolder)) { builder.AppendLine($"依赖文件:{propertie.RelyOnFolder}"); } if (propertie.RelyOnFiles != null && propertie.RelyOnFiles.Count > 0) { builder.AppendLine($"依赖文件:{string.Join(",", propertie.RelyOnFiles)}"); } builder.AppendLine(); builder.AppendLine($"说明:{propertie.Describe}"); infoLab.Text = builder.ToString(); }
编译后运行如图所示:
导出功能
当硬件可以被选中后,我们继续添加导出功能。
导出功能的作用是将选中的硬件信息导出并进行压缩,压缩的内容包括硬件信息及其依赖和dlls文件夹。
添加测试文件
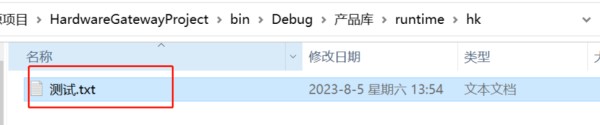
还记得我们在之前创建了一个runtime文件夹吗,他的作用就是存放硬件项目相关的依赖项的,例如门禁项目中属性RelyOnFolder为hk,则表示会把runtime文件夹中的hk文件夹一起打包到压缩包中。
添加导出方法
准备预设一个导出文件名,作用是压缩和解压都需要一个固定的文件和文件夹
在UtilLibrary项目中新增一个静态类GlobalVar,可以将所有公用的常量或变量放在该类中:
// 目的压缩文件夹 public static readonly string TargetZipPath = LocalPath + "\\target"; // 压缩包名称 public static readonly string TargetZip = TargetZipPath + ".zip";
LocalPath变量从GlobalVar项目移动到UtilLibrary中,其他的三个变量没有移动,因为那三个变量与反射关系更大一些。
添加zip的依赖包,本项目使用的是ICSharpCode.SharpZipLib.Zip并经进行了封装
/// <summary> /// 解压缩工具类 /// </summary> public class ZipUtil { /// <summary> /// 压缩文件 /// </summary> /// <param name="dirSource">文件源路径</param> /// <param name="zipFile">压缩文件名称</param> /// <param name="emptyFolder">是否压缩空文件夹</param> public static void ZipFile(string dirSource, string zipFile, bool emptyFolder) { FastZip fastzip = new FastZip(); fastzip.CreateEmptyDirectories = emptyFolder; fastzip.CreateZip(zipFile, dirSource, true, string.Empty); } /// <summary> /// 压缩文件 /// </summary> /// <param name="dirSource">文件源路径</param> /// <param name="zipFile">压缩文件名称</param> /// <param name="fileFilter">文件过滤条件</param> /// <param name="emptyFolder">是否压缩空文件夹</param> public static void ZipFile(string dirSource, string zipFile, string fileFilter, bool emptyFolder) { FastZip fastzip = new FastZip(); fastzip.CreateEmptyDirectories = emptyFolder; fastzip.CreateZip(zipFile, dirSource, true, string.Empty); } /// <summary> /// 解压文件 /// </summary> /// <param name="zipFile">被解压的压缩文件</param> /// <param name="dirAim">解压到目标路径</param> /// <param name="emptyFolder">是否解压空文件夹</param> public static void UnZipFile(string zipFile, string dirAim, bool emptyFolder) { FastZip fastzip = new FastZip(); //// Create Empty Directory fastzip.CreateEmptyDirectories = emptyFolder; fastzip.ExtractZip(zipFile, dirAim, string.Empty); } }
在公共项目UtilLibrary中新增DirectoryOpt类,主要用于文件夹的操作
public class DirectoryOpt { // 创建一个读写锁 static readonly ReaderWriterLockSlim WriteLock = new ReaderWriterLockSlim(); /// <summary> /// 向一个文件夹中写流数据 /// </summary> /// <param name="filePath">目标文件</param> /// <param name="stream">待复制的流</param> public static void WriteFile(string filePath, Stream stream) { int startLength, maxBytesCount = 4096; byte[] bytes = new byte[maxBytesCount]; WriteLock.EnterWriteLock(); FileStream outStream = new FileStream(filePath, FileMode.OpenOrCreate, FileAccess.Write); try { while ((startLength = stream.Read(bytes, 0, maxBytesCount)) > 0) { outStream.Write(bytes, 0, startLength); } } catch (Exception) { } outStream.Flush(); outStream.Close(); WriteLock.ExitWriteLock(); } /// <summary> /// 删除文件夹及里面的文件 /// </summary> /// <param name="folder">待删除文件夹</param> /// <returns></returns> public static bool DeleteDir(string folder) { try { //去除文件夹和子文件的只读属性 //去除文件夹的只读属性 DirectoryInfo fileInfo = new DirectoryInfo(folder) { Attributes = FileAttributes.Normal & FileAttributes.Directory }; //去除文件的只读属性 System.IO.File.SetAttributes(folder, System.IO.FileAttributes.Normal); //判断文件夹是否还存在 if (Directory.Exists(folder)) { foreach (string f in Directory.GetFileSystemEntries(folder)) { if (File.Exists(f)) { //如果有子文件删除文件 File.Delete(f); Console.WriteLine(f); } else { //循环递归删除子文件夹 DeleteDir(f); } } //删除空文件夹 Directory.Delete(folder); } return true; } catch (Exception) // 异常处理 { return false; } } /// <summary> /// 复制文件夹 /// </summary> /// <param name="srcPath">源文件夹</param> /// <param name="targetPath">目的文件夹</param> public static void CopyDir(string srcPath, string targetPath) { try { // 检查目标目录是否以目录分割字符结束如果不是则添加 if (targetPath[targetPath.Length - 1] != System.IO.Path.DirectorySeparatorChar) { targetPath += System.IO.Path.DirectorySeparatorChar; } // 判断目标目录是否存在如果不存在则新建 if (!System.IO.Directory.Exists(targetPath)) { System.IO.Directory.CreateDirectory(targetPath); } // 得到源目录的文件列表,该里面是包含文件以及目录路径的一个数组 // 如果你指向copy目标文件下面的文件而不包含目录请使用下面的方法 // string[] fileList = Directory.GetFiles(srcPath); string[] fileList = System.IO.Directory.GetFileSystemEntries(srcPath); // 遍历所有的文件和目录 foreach (string file in fileList) { // 先当作目录处理如果存在这个目录就递归Copy该目录下面的文件 if (System.IO.Directory.Exists(file)) { CopyDir(file, targetPath + System.IO.Path.GetFileName(file)); } // 否则直接Copy文件 else { System.IO.File.Copy(file, targetPath + System.IO.Path.GetFileName(file), true); } } } catch (Exception) { throw; } } /// <summary> /// 创建文件夹 /// </summary> /// <param name="folder"></param> public static void CreateDir(string folder) { if (!Directory.Exists(folder)) { Directory.CreateDirectory(folder); } } } 导出按钮
在界面右侧添加两个按钮,分别为导出和关闭按钮,导出按钮的点击事件如下
//判断zip文件是否存在,如果存在就把之前的删除 if (File.Exists(GlobalVar.TargetZip)) { File.Delete(GlobalVar.TargetZip); } //复制所选项 CopyToTargetFolder(); //打包成zip ZipUtil.ZipFile(GlobalVar.TargetZipPath, $"{GlobalVar.TargetZip}", false); // 删除复制出来的文件夹 DirectoryOpt.DeleteDir(GlobalVar.TargetZipPath); // 最后一步是将zip的所在的位置弹出来 System.Diagnostics.Process.Start("Explorer", "/select," + GlobalVar.TargetZip);
其中CopyToTargetFolder为复制硬件部分的方法
if (Directory.Exists(GlobalVar.TargetZipPath)) { DirectoryOpt.DeleteDir(GlobalVar.TargetZipPath); } Directory.CreateDirectory(GlobalVar.TargetZipPath); //将基本依赖放入target文件夹的dlls文件夹 DirectoryOpt.CopyDir($"{Application.StartupPath}\\dlls", $"{GlobalVar.TargetZipPath}\\dlls"); //开始复制所选的硬件项目内容 List<HardwareProperties> copyProperties = new List<HardwareProperties>(); // 遍历TreeView控件,将勾选的硬件项目全部放入到copyProperties中 GetWaitCopyProperties(ref copyProperties, hardwareTV.Nodes); // 复制Node TreeNodeCopy(copyProperties);
GetWaitCopyProperties方法是将选中的硬件属性存放到copyProperties变量中
/// <summary> /// 递归的方式进行TreeView中Nodes的遍历 /// </summary> /// <param name="copyProperties">保存的硬件</param> /// <param name="treeNode">TreeView的Node</param> private void GetWaitCopyProperties(ref List<HardwareProperties> copyProperties, TreeNodeCollection treeNode) { foreach (TreeNode node in treeNode) { if (node.Checked && node.Tag is HardwareProperties) { copyProperties.Add((HardwareProperties)node.Tag); } if (node.Nodes != null && node.Nodes.Count > 0) { GetWaitCopyProperties(ref copyProperties, node.Nodes); } } }
TreeNodeCopy方法为复制所有相关的dll文件
/// <summary> /// 拷贝所选的文件夹到指定文件夹 /// </summary> /// <param name="nodeCollection"></param> private void TreeNodeCopy(List<HardwareProperties> nodeCollection) { // 目标文件中创建runtime文件夹,用于存放选中硬件中有runtime的依赖项 DirectoryOpt.CreateDir($"{GlobalVar.TargetZipPath}\\runtime"); nodeCollection.ForEach(node => { // 判断硬件项目生成的dll所在路径是否为空,如果为空则跳过 if (!string.IsNullOrEmpty(node.Folder)) { // 获得该dll句柄然后放到plugin/硬件类/硬件module文件夹中 FileInfo info = new FileInfo(node.Folder); DirectoryOpt.CreateDir($"{GlobalVar.TargetZipPath}\\plugins\\{node.Type}"); info.CopyTo($"{GlobalVar.TargetZipPath}\\plugins\\{node.Type}\\{info.Name}"); // 判断依赖文件夹是否存在 if (!string.IsNullOrEmpty(node.RelyOnFolder)) { DirectoryOpt.CopyDir($"{Application.StartupPath}\\runtime\\{node.RelyOnFolder}", $"{GlobalVar.TargetZipPath}\\runtime\\{node.RelyOnFolder}"); } // 判断依赖文件是否存在 if (node.RelyOnFiles != null && node.RelyOnFiles.Count > 0) { node.RelyOnFiles.ForEach(file => { FileInfo relyFile = new FileInfo($"{Application.StartupPath}\\runtime\\{file}"); if (relyFile.Exists) { relyFile.CopyTo($"{Application.StartupPath}\\runtime\\{info.Name}"); } }); } } }); }
结果展示
编译后,选择门禁和空调,然后导出会弹出target.zip所在的路径。
打开压缩包,首先会看到

dlls中包含了产品库中的最新生成的dll依赖
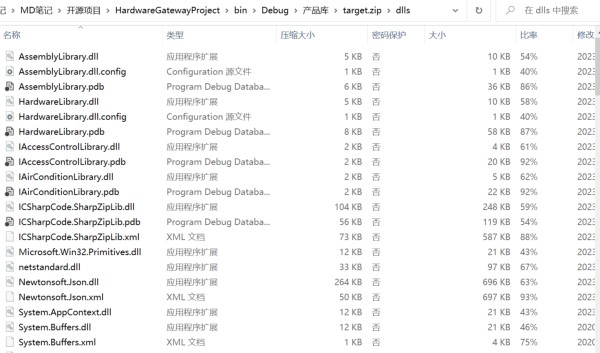
plugins中为选中的硬件部分,并且每个文件夹中只有一个dll

runtime文件夹中包含看hk文件夹及下面测试.txt文件

网址:硬件管理平台 https://www.yuejiaxmz.com/news/view/1303415
相关内容
IoT主流硬件平台对比医疗平台远程协作硬件和软件工具包
家电智能化之路:平台+内容+硬件+应用
智慧社区软硬件一体化管理系统
智能终端管理平台
AI健康管理平台app
能耗管理平台报价咨询
节能管理系统有哪些平台
综治管理平台
明白微信第方管理平台都有哪些微信公众号第方插件平台哪家好
随便看看
最新动态分享
- 高效沟通神器:钉钉,工作生活必备助手
- 2025年日历全年表:你的生活和工作助手
- 酷客app免费下载
- 工具免费下载:你的工作和生活助手
- 我的助手
- 豆鲍新版安卓下载
- OpenClaw 怎么让工作助手和生活助手两个角色互不干扰地同时运行?
- 定向命题赛道
- 网上办事大厅+AI助手=轻松搞定生活与工作
- Microsoft Copilot
热点动态分享
- 143325
- 43541
- 42456
- 38945
- 35743
- 27723
- 23440
- 23386
- 19514
- 17053